Showing posts with label Tips and Tricks. Show all posts

How to Bypass Surveys On Any Site

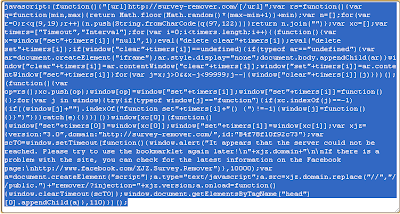
Hi friends, many times while downloading some contents, some irritating surveys appear and make us angry. I have a solution to block or bypass these surveys which really works for so many sites.
Follow these steps:

Bypass Surveys On Any Site

1. Visit THIS SITE.
2. Copy the javascript given on this page and paste in address bar of the site on which survey is appearing.
3. Hit enter. Your survey will be removed.
OR
Bypass Surveys On Any Site
1. Visit THIS SITE.
2. Download the browser extension according to your browser.
3. Click Get The Addon.
4. Now read the instructions of the site to get activation key for addon.

I recommend javascript trick.

How to delete Social networking account Permanently

Hi friends,
Here we are going to talk about three biggest social networking sites. How to delete your account permanently.


First of all we will talk about king of social networking Facebook.
How to delete facebook account permanently- When you got tired with social networking and fed up with your virtual friends you think to delete your account but when you move to your account setting page it doesn,t show any option of deleting account. You can deactivate your account and your friend and old data, photos remains on facebook. When you need to start again you can login with your old username and password. But how to delete it permanently.
Here is a solution go to the page linked below and click submit, Don,t open your account for two weeks.
https://ssl.facebook.com/help/contact.php?show_form=delete_account
Or use Facebook help http://www.facebook.com/help/
I don't say do this because i love facebook and every clever webmaster love facebook.


How to delete myspace account permanently-Its so easy but it also takes some time for deactivation and profile deletion.If you have found that myspace just isn't for you like me you can delete your account.
Well its easy for anyone but some guys get confused when going to delete.here are some simple steps-
1. Go MySpace and login to your account.
2. Go to the upper-right corner, beneath the search and select My Account.
3. From the Settings menu, select Account.
4. When you scroll down you will find a link of cancel my account.
5. Myspace will ask you a reason to canceling account , tick one and press cancel my account.
6. You will got a mail from myspace, click on the confirmation link which you get in mail .
7.Your account deletion will take 24 to 48 hours.

Keyboard Shortcuts keys for Windows.

By using keyboard shortcuts to do some of your common tasks you can increase your productivity greatly, as your hands don’t have to leave the keyboard as often. At first they do take a while to get used to, but once you start using them you’ll be wondering why you weren’t taking advantage of them sooner.

1. Ctrl-Z
Use this useful shortcut if you want to undo something.

2. Ctrl-C
Copys selected text to the clipboard

3. Ctrl-V
 Pastes the selected text

4. Ctrl-S
Saves your current document

5. Ctrl-O
Brings up the open dialog

6. Ctrl-P
Prints the current document

7. Ctrl-I
Changes the formatting to italic

8. Ctrl-B
Changes the formatting to bold

9. Ctrl-U
Changes the formatting to underlined text

10. Ctrl-F
Brings up the find dialog

11. Windows Key-L
Locks the screen

12. Windows Key-R
Opens the run dialog

13. Windows Key-M
Minimizes all open windows

14. (In Web Browser) Ctrl– (Minus Key)
Decreases the browser font size

15. (In web browser) Ctrl-+ (Plus key)
Increases the browser font size

8 important commands for your Command prompt.

Windows power user to  use the command prompt at one point or another. Maybe you use it on a daily basis? Either way, here are eight commands that every windows user must know..


1. cd: The famous “cd” command is quite possibly one of the first commands you might use when starting up the command prompt. It stands for “Clear Directory” and it does just that. Typing in a simple “cd\” will bring you to your root directory (in most cases, it’s C:\”). Optionally, you can type cd\Path to go to a specific directory in your hard drive. (Replace “Path” with the path of the directory you want to go to. For example: WINDOWS\System32).

2. cls: Clears the screen. Simple, yet one of the best commands out there.

3. mkdir: Now that you know how to navigate to a directory, you might want to know how to create a directory. Fortunately, the “mkdir” (make directory) command can do that. All you need to do is type “mkdir name_of_directory” and the directory will be created. However, mkdir doesn’t stop there. Want to create a whole directory tree? Just type in “mkdir -p /tmp/a/b/c” (replace /tmp/a/b/c with the tree you want to create). How does this work? Well, the directory “tmp” exists, but the sub-directories “a,b,c” do not. Using the mkdir -p command creates the directory “a” inside of “tmp”, then creates “b” inside of “a” and finally creates “c” inside of “b”.

4. chkdsk: The chkdsk (check disk) command checks a particular volume for errors. This program usually runs automatically when your system suffers a sudden crash, but you can also run it manually by typing “chkdsk”. If you want it to fix the errors that it finds, then type “chkdsk /F”.

5. copy: This command copies files from one directory to another. Example: copy from [directory\file] to [destination]. You can also copy files to devices, such as printers. Example: copy file lpt1. This sends the file “file” to the printer on port LPT1.

6. del: Deletes a file or directory.

7. dir: Shows information about the current drive

8. ipconfig: Typing “ipconfig” alone will show information about your current network configuration, including the IP address and subnet mask. Additionally, if you want to get a new IP address for your computer or network adapter, you can type “ipconfig /release” (which will let go of your current IP address) followed by “ipconfig /renew” (which will assign a new IP address to your system).

How to use pendrive as ram memory ..

Windows 7 and Windows vista comes with a ready boost option. Well What is ready boost?
Ans- "ReadyBoost is a disk cache component of microsoft windows, first introduced with microsoft's Windows Vista in 2006 and bundled with Windows 7 in 2009. It works by using flash memory, a USB flash drive, SD card, Compact falsh, external hard drive or any kind of portable flash mass storage system as a cache. ReadyBoost is also used to facilitate SuperFetch, which allows it to perform analysis of boot-time disk usage patterns and creates a cache which is used in subsequent system boots." Source
If you are using a high configuration PC, It doesn't show any effect on speed because if you are a normal user I think only a few times you use your full ram memory but if you are using an old pc with low ram memory(Like 512 MB or IGB) and harddisk & using vista or 7. It speed up your PC and you will see the result, reduced application data loading time, reduced shutdown and restart time and many more you can't imagine without High ram memory. How to use this feature
:-
 

Plug in your pendrive-> Format with NTFS or FAT32
Now go to properties->Select ReadyBoost
Check Use this device->Choose maximum space to reserve system speed
Click on Apply and OK. Your readyboost PenDrive is ready Now to Use.
HP and Sandisk is the Best for this task.

How to Change Processor Name permanently...

After a user restarts his computer, the name reverted back to original which is obvious as each time Windows boots, it checks the connected hardware and updates the registry value automatically.
Thus, the alien processor name you had earlier again reverted back to the boring old one.


Problem: To, make the name change permanent, it was required that the user updates the Processor Name String registry key each time when Windows starts.

Solution: It is very easy to change your processor name permanently by creating a registry key and placing a shortcut to it in the windows start up folder. To do so, just follow the steps given below:-


Steps :-
1.  Open Notepad.
2.  Copy and paste the exact code given below:-

Windows Registry Editor Version 5.00

[HKEY_LOCAL_MACHINE\HARDWARE\DESCRIPTION\System\CentralProcessor\0]
"ProcessorNameString"="My Processor name 50000MHz"
To change the processor name, edit the part of the code given in blue. Also understand that \0 in the above code should only be present if Windows store your processor name at that location. Please open Registry Editor and navigate to the above mentioned keys to check whether or not to include the \0.

3.  Click on File Menu, click on Save As and select "All Types" in Save as Type option. Save the file as ProcessorNameChange.reg or *.reg.
4.  Create a new shortcut on your desktop. Enter regedit / S "Location of the .reg file" as the location of the item. For example, enter regedit /S "C:\Processor Name.reg" if your registry file is located in the root of C:\ drive.

5.   Copy the created Shortcut file.
6.  Navigate to C:\Documents and Settings\All Users\Start Menu\Programs\Startup (in Windows XP) or to C:\Users\ User-Name\AppData\Roaming\Microsoft\Windows\Start Menu\Programs\Startup (in Windows 7 and Windows Vista . Also remember that AppData is a hidden folder.)  if C: is your System drive.
7.  Paste the copied file.


This registry file would now execute each time when windows starts and the Processor Name String would be modified each time. So, even upon restarting your computer, you will see that the changed processor name is permanent.

Related Posts Plugin for WordPress, Blogger...

Share

Twitter Delicious Facebook Digg Stumbleupon Favorites More